Hoppo Bumpo (n): A children's game. Played by folding one's arms and hopping on one leg. Aim is to bump opponents, so that they lose their balance. Last person standing wins.


Showing posts with label Seams. Show all posts

March 25, 2009

Seam along week 9 (final) - Decorative seams

Previously on seam-along ...
Introduction
Week 1 - Simple edge finishes
Week 2 - French seams
Week 3 - Bound seams
Week 4 - Flat fell seams
Week 5 - Taped (stabilised) seams
Week 6 - Overlocked seams
Week 7 - Bulky seams
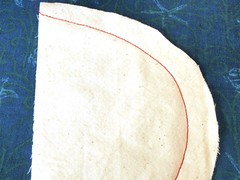
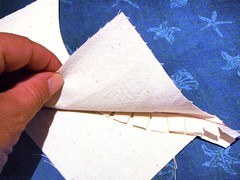
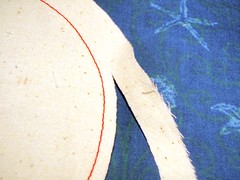
Week 8 - Curves and corners

Introduction

For the final week of my work on my seam sampler, I decided to try some decorative seams: finishes that can be used to pretty-up the outside of a project. I had great fun trialling top stitching, binding and piping.

Top stitched seams

Top stitching is a visible line of stitching found on the finished side of the seam. This simple,decorative stitch line gives a nice smart finish to the seam.

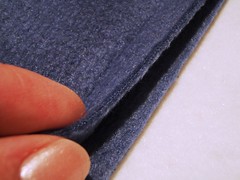
To start, I tried out single top stitching using some denim. First I sewed a plain seam and then press it to one side.


Next I threaded my machine up with a nice contrasting red thread (put your sunglasses on!).

Ideally top stitch is done with a proper top stitching - or button hole twist - thread. This is a heavier weight thread that really stands out. I used Gutterman branded thread. You need only thread the spool - the bobbin can take normal weight thread.


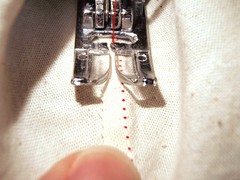
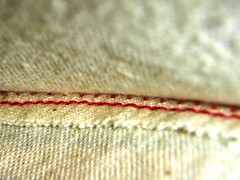
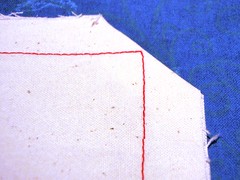
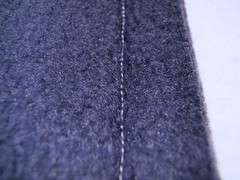
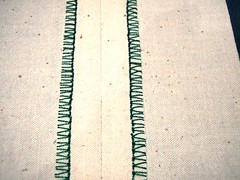
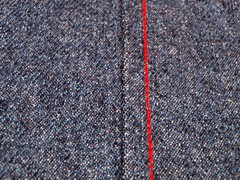
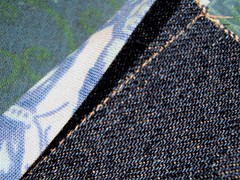
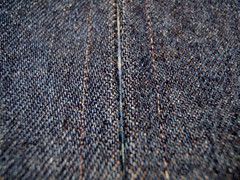
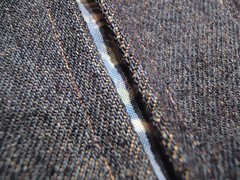
From the right side of the fabric, I then sewed a single (relatively!) straight line parallel to the seam edge. See how well the top stitch thread stands out?


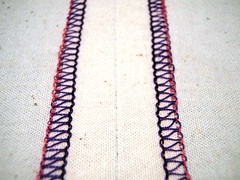
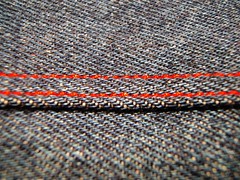
For a fancier effect you can do double top stitching - two parallel lines.


You can sew the lines separately, but the easiest way to create a double row is to use a twin needle.

If you haven't tried one of these before they are great fun. They come in a variety of types and gauges (e.g. stretch, universal, jean), as well as having varying distances between the needles.

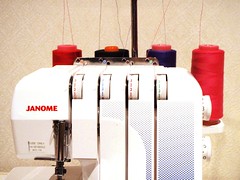
Aside from the twin needle (shown below) you do need a second spool pin on your machine. Initially I had to hunt around on my Janome, working out what to do. Some machines have a fixed second spool pin, but on my machine the vertical second pin is a little attachment.


Once you have set up your second spool pin, you pop both reels on the machine (I cheated economised and bought just the one reel, then wound a bit of thread onto a bobbin!) and thread both up, passing the thread through the separate needles.

Note: It is possible for the two threads to get tangled and break during sewing. It can get UGLY! To minimise the chance of this happening, pass the thread down separate sides of the little tension disc near the top of the machine, when you are threading. Try also to sit the reels on the spool pin so one winds clockwise and the other, anti-clockwise.

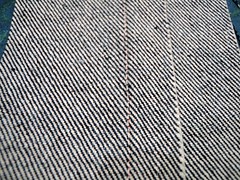
Finally, as you sew you will see two beautiful evenly spaced lines of stitching appear. On the reverse size of the stitching, you will see a sort of zig-zag stitch that passes between the two lines. This is because you have only one thread available from the bottom (bobbin).

Bound seam

The seam is created by binding matching the wrong sides of the fabric together and then enclosing the seam in bias binding. I have tried this on a couple of bags. It works nicely where the seam doesn't need to be opened out flat and gives a clean finish to the inside of the seam.

For this finish you need a length of purchased or handmade double-fold bias binding.

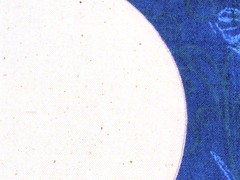
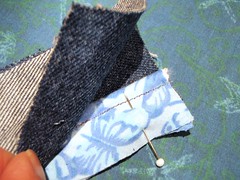
In the example below, I matched the wrong sides of the denim fabric together.


Next I open one side of the bias binding out and matched its edge with the edge of the seam allowance. I then pinned it in place.


The next step was stitch all the way along the fold line on the bias binding.


Once this was done, I carefully turn the free edge of the binding over, to enclose the the whole seam edge. Again, I pinned the binding in place.


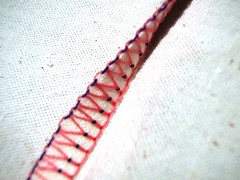
Finally I "stitched in the ditch" - that is the little dip where the denim fabric and the binding met. This caught in the binding on the reverse side.


Et voila! A nice neat bias bound seam.


Piped seam

Piping is a tube of bias-cut, decorative fabric that you sew into the seam. There are two sorts: flat (just the fabric tube) and corded (where the tube wraps around a piece of cord). For my sampler, I decided to try making corded piping. You can purchase different-sized piping cord from haberdasheries.

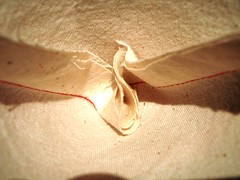
To begin, I cut a strip of fabric on the bias. If you have a long seam and need lots of piping, you will almost certainly need to join the fabric strips end-to-end. Its a very similar process to making bias binding - see here for some photographs demonstrating how to attach the ends.

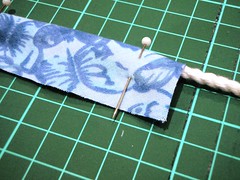
The width of the strip needs to be great enough to enclose the cord and leave a 1.5cm [⅝"] seam allowance.


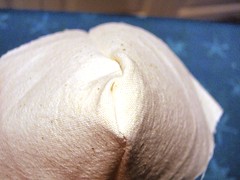
Next, I enclosed a piece of cord and matched the raw edges of the fabric strip. I then pinned it to hold the cord in place.


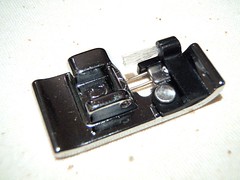
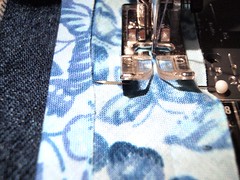
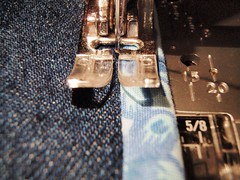
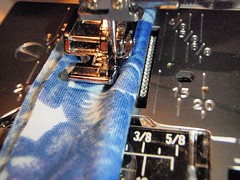
Then, I attached a zipper foot to my machine and positioned it to the left of the needle. A zipper foot allows you to sew close to the cord. (There are also special piping presser feet you can buy for different machines).

A word of warning ... in my excitement/naivety I sewed a little bit too close in to the cord! See how close the needle is? Whew - I sewed up that cord within an inch of its life!!

The wise sewer would leave a wee gap, so that one additional row of stitching can be added between this stitch line and the cord, when sewing the actual seam later.


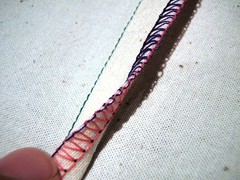
Finally I sandwiched the piping between the fabric, with the right sides of the denim together. The cord faced away from the seam allowance. Then I stitched the seam.


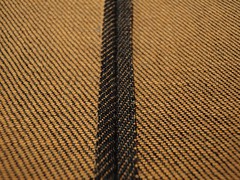
After turning the seam right-side out, the pretty, rounded piping is visible.


Channel seam

This is a very cute seam - certainly something a little bit different. I chanced upon it this week while reading through a reference book. Its classified as a top-stitched seam, but has an interesting twist.

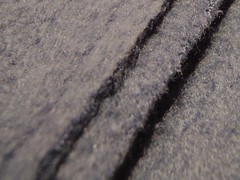
To begin, I machine basted a plain seam (using nice long stitches), then pressed the seam allowance open.


Next I cut a strip of fabric the width of the seam allowance and length of the seam. Matching the right side of the strip with the wrong side of of the seam, I pinned the strip in place. You can choose a matching or a contrasting fabric.


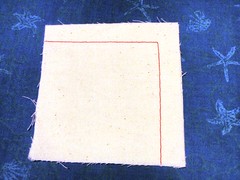
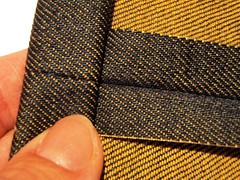
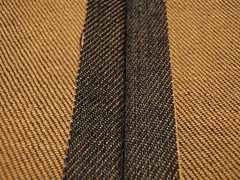
Then I flipped the fabric to the right side and top stitched through all the thicknesses, along both sides of the seam. In the picture below, you can see that I have already sewed down the right-hand side.


And finally, I carefully remove the large stitches from the machine basting, using my seam ripper. This opens up the "channel".


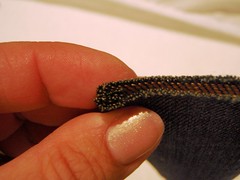
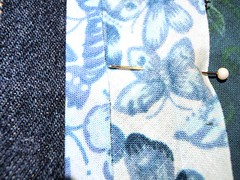
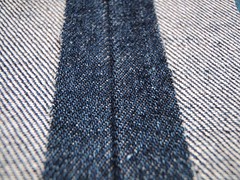
Here is the finished channel seam.


Peek-a-boo!


Conclusion

I will definitely use all these decorative finishes again. They are all quite straight forward, though I would like a little more practice with piping, to make sure I get the stitching in just the right place. The channel seam was a definite favourite, so now I am on the look-out for the right project to use it with.

Do you have other decorative seam finishes that you like using?


Next week: This is the conclusion of the seam-along. I've had great fun putting my sampler together - I hope its been useful to you too. I am on a roll now, so next week I will be starting a hem sampler. Stay tuned for details of the types of machine and hand sewn hems that I will look at. If you would like to hem-along with me, you are most welcome! Update: Hem-related articles can be found over here.

March 18, 2009

Seam along week 8 - curves and corners

Previously on seam-along ...
Introduction
Week 1 - Simple edge finishes
Week 2 - French seams
Week 3 - Bound seams
Week 4 - Flat fell seams
Week 5 - Taped (stabilised) seams
Week 6 - Overlocked seams
Week 7 - Bulky seams

Edit: Seam-along has now concluded. Click here if you would like to see all 9 weeks of posts.

To date in the seam-along, I have kept my seams strictly on the straight and narrow. This week, however, I decided to get more adventurous and see how to finish seams sewn on curves and corners.

The seam allowances on curves are shorter or longer than the stitch line, so need some assistance to sit flat. Likewise corners will not turn out to points unless you intervene.

Notching

Notching is used on convex (outward) curves. I have sewn a convex seam below - you can see that the seam allowance is slightly longer than the stitch line.


When the seam is turned you can see the effect this has on the seam allowance. Hideous! The seam allowance is too long to sit flat - instead it is bunching. This creates corresponding dimples along the right side of the seam.


To remove the bunching and create the proper rounded edge along the seam, you use a simple technique called notching. I tried this by turning the seam back to the wrong side and cutting small wedges out of the allowance. I used nice sharp scissors and being the klutz I am, made sure I kept well away from the stitch line.


After turning and pressing the seam, you can see that the allowance sits beautifully flat.


Clipping

Clipping is used on concave (inward) curves. I have sewn a concave seam below - you can see that the seam allowance is slightly shorter than the stitch line.


My attempts to turn the seam right-side-out were almost completely futile - the short allowance to stitch line ratio, simply makes the whole thing too tight. In my example below you can almost hear the seam going B-O-I-N-G as it tries to flip back inward!


To fix this problem, you need to create more room in the seam allowance. This allows it to spread and sit flat. The technique you use is called "clipping". I tried this by turning the seam back to the wrong side and cutting small slits into the allowance. Once again I used nice sharp scissors and took care not to cut into the stitch line.


After turning and pressing the seam, the result is a nice curve ...


... with a seam allowance that sits flat.


Trimming

Another technique you can use on both convex and concave curves is trimming. This helps bring the the length of the seam allowance more into alignment with the stitch line. It can also help preserve some of the integrity of the seam. Clipping, for example, does relax a seam quite dramatically and in some cases you may not want this effect.

(For a very good explanation of when to use trimming rather than clipping and notching in garment making, see the March 2009 edition of Sewing with Australian Stitches vol. 17 no. 1. )

In my example below, I have trimmed the seam allowance. Generally you would reduce the allowance back to about half, but where the curve is tighter you might trim further.

Optional: The allowance could now be finished with one of the finishes that has been discussed in previous weeks. I haven't finished the seam allowance in this example, but a Hong Kong finish would have looked rather nice!


Optional: Next, in the picture below, you can see that I turned the seam to one side (the left) and stitched close to the left of the original seam line. This is called understitching and is a little bit tricky on a curve.

Why did I do this you ask? Well, it seemed like a good idea at the time. The Stitches article mentioned it and I thought I would give it a go! You don't have to do this, but it is a useful technique when you are making a garment. It keeps the seam allowance neatly in place and stops a curvy seam from rolling outwards. (Examples of curvy seams include necklines, armholes and waistbands). You turn the seam allowance and stitch towards the inner side of the garment.


The overall result is that the trimmed seam allowance sits nice flat (especially with that understitching) ...


... and a seam edge that has a nice clean curve. Beautiful! (Er ... well, as beautiful as a bit of curvy calico can be, that is).


Corners

My final experiment this week was with a seam sewn around a corner.


When the seam is turned right side out, it is almost impossible to get a nice point at the corner.


When we look back at the wrong side, it is easy to see why. Look at all that bunched up seam allowance, jostling for real estate in the corner!


To remedy this, I turned the seam back to the wrong side and removed some bulk by clipping off the point at the corner. Again I needed to very careful not cut through the stitching! For a more acute angle, you can trim away some of the seam allowance on both sides to taper it in towards the corner.


When the seam is turned and pressed there is a nice clean corner.


Conclusion

I think I would be more likely to use trimming for curves on garments, now that I know this works so well. If your fabric frays the allowance can then be finished with binding or an overedge stitch. Clipping and notching would work well where the seam is not exposed and inclined to fray.

What do you think? Clipping/notching or trimming? What do you do?


Next Wednesday: The series final - ta-dahhh! I will be looking at some decorative seams - including piping - just for fun.

March 05, 2009

Seam along week 7 - bulky seams

Previously on seam-along ...
Introduction
Week 1 - Simple edge finishes
Week 2 - French seams
Week 3 - Bound seams
Week 4 - Flat fell seams
Week 5 - Taped (stabilised) seams
Week 6 - Overlocked seams

This week I looked at how to finish seams that are very bulky. A seam can become bulky if the fabric you are using is thick or if there are many layers involved. A bulky seam can be difficult to turn and keep flat. In the example below, the seam has caused a visible ridge.


Bulky seams that intersect can quickly become very substantial and difficult to sew. The hem and intersecting seam, in the denim example below, is very thick.


To ensure that your seam sits nicely and that a big, fat seam ridge isn't visible, there are a couple of techniques you can try.

Trimming
Trimming involves removing some of the excess seam allowance. To begin, I sewed a plain seam on this medium-weight denim fabric.


I pressed the seam open ...


... then I trimmed the seam allowance back to about half the original width.


The seam sits nicely with the narrower allowance.


Commercial patterns often contain instructions about where and how to trim your seam allowance. On lighter fabrics you can cut both sides at once. For very thick fabrics you might need to trim each side separately.


Grading
Grading also involves cutting some of the seam allowance. It is used on a seam that will remain enclosed and won't be pressed open. The parts of the seam allowance are staggered, to distribute the bulk.

Once again I sewed a plain seam on some nice chunky polar fleece.


As you can see below, the seam allowance is quite thick.


After opening out the fabric and pressing the seam to one side, I cut the allowance back. The outermost side of the allowance remained the widest and the innermost the narrowest.


Conclusion
I've previously trimmed seams (following pattern instructions) but hadn't tried grading. Both techniques will be very handy. I particularly like the way the graded seam sat. Depending on the fabric, it might still be necessary to use overedging or overlocking to prevent the raw edges fraying.

Have you been seaming-along? Which is your favourite?

Next Wednesday: Stay tuned next week, when I will be investigating how to finish seams that run round curves and corners. Read more about curves and corners via Google.

February 25, 2009

Seam-along week 6 - overlocked seams

Previously on seam-along ...
Introduction
Week 1 - Simple edge finishes
Week 2 - French seams
Week 3 - Bound seams
Week 4 - Flat fell seams
Week 5 - Taped (stabilised) seams

This week I looked at overlocking - or serging - seams. I tried a couple of methods that create super-fast, beautifully neat seam finishes.

If you don't own an overlocker (serger), don't tune out just yet, as I also tested out a sewing machine alternative, just for you!

Overlocking
If you're not overly familiar with an overlocker, they really are an amazing piece of gadgetry.

Home overlocking (serging) machines generally have two needles and two loopers that create an intertwined stitch using up to four threads. All the thread is spooled from the top of the machine. As a stitch is created, the overlocker also trims away the excess fabric to the right, leaving your seam with a line of perfectly overedged stitching. Overlockers also sew exceptionally quickly - about 1500 stitches per minute - so are much faster than a conventional sewing machine.


While overlockers can do many and varied things, this week I decided to look at two very basic finishes: the three and four thread stitches.

3-thread overlock finish
To begin, I matched the right sides of the fabric together and sewed a plain seam using my regular sewing machine.


Next I opened out the seam allowance and moved to the overlocker. A three-thread stitch needs only one needle, so next I unscrewed and removed the left-hand needle from the machine. I then passed the edge of both seam allowances through the overlocker. The seam below has been overlocked and neatly pressed open.


This three-thread stitch is good for neatening seam edges. If you would like to see the stitching in more detail, I have created a notated picture over here. It explains which parts of the stitching has been created by the needle and each of the loopers.

Rather than opening out the seam you may prefer to stitch the two sides of the seam allowance together and press it to one side. I have done this in the example below. I have flipped it up at the edge closest to you, so that you can see the underside of the stitching.


If you think you might need to alter your seams at any stage, it is a good idea to try and sew very close to the edge of the allowance, so as not to remove to much of the fabric. If this is not an issue, then you can stitch quite close to the original seam line and the overlocker will trim most of the seam allowance off.

4-thread overlock stitch
A four-thread stitch sews the seam, as well overedging and trimming the seam allowance off. When you use this type of stitch, you don't need to create a seam with your sewing machine first.

To create the 4 thread stitching, I attached the left-hand needle to the machine again. Next I placed the right sides of the fabric together and then passed the fabric through the overlocker.

When you use two needles, an additional line of stitching is added. If you look at the photograph below you might (just!) see a red line of stitching running along the left. This is the seam. All the other parts of the stitching (purple, pink and black) form the overedging.


In the example below I have flipped the seam up, so that you can see the underside.


This type of seam is pressed flat to one side. The top side of the seam should be side that had been upper-most when you were stitching.

Faux overlocking - using your sewing machine
Now what if you don't have an overlocker? The good news is some sewing machines come with stitches and presser feet that will approximate an overlocked stitch. The stitch construction is of course more basic than a proper overlocked stitch (as there is just one needle and bobbin) and the machine cannot trim the excess fabric. That said, you can still produce a nice finish.

For this experiment, I purchased an overedge foot for my Janome sewing machine (DC3018), then after consulting my manual selected an overcast stitch. You will need to consult the manual for your particular make and model of sewing machine to see if you can do something similar. I'm assuming that the older and more basic your machine is, the less likely you will be able to do this.


To begin I placed the right sides of my fabric together, then sewed a plain seam. After this I opened out the seam, then sewed using the overcast stitch down both sides of the seam allowance.


The result looks (to the untrained eye and from a distance!) not dissimilar to a real overlocked stitch. It is a very neat finish. The manual for my sewing machine explains that this particular stitch can be used to seam and overedge at the same time - much like the 4-thread stitch on the overlocker.


Conclusion
I haven't owned an overlocker for very long, so I am still learning how to make the best use of it capabilities. I am also trying to overcome my gross incompetence at threading, which has created more problems than I'd care count! That aside, I do love the beautiful neat and very quick finish that the overlocker gives. If you do a lot of sewing, they are awfully handy.

But I am also quite impressed with the nice finish that the sewing machine gives too. I'd have to say that I will be tempted to use this on the occasions when the overlocker and I are not on speaking terms!

Have you been seaming-along? Which is your favourite?

Next Wednesday: Stay tuned next week, when I will be investigating how to finish seams that are getting too bulky. Read more about bulky seams via Google.