
Introduction
Week 1 - Simple edge finishes
Week 2 - French seams
Week 3 - Bound seams
Week 4 - Flat fell seams
Week 5 - Taped (stabilised) seams
Week 6 - Overlocked seams
Week 7 - Bulky seams
Week 8 - Curves and corners
Introduction
For the final week of my work on my seam sampler, I decided to try some decorative seams: finishes that can be used to pretty-up the outside of a project. I had great fun trialling top stitching, binding and piping.
Top stitched seams
Top stitching is a visible line of stitching found on the finished side of the seam. This simple,decorative stitch line gives a nice smart finish to the seam.
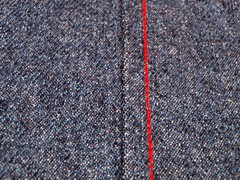
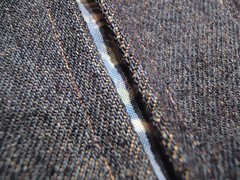
To start, I tried out single top stitching using some denim. First I sewed a plain seam and then press it to one side.
Next I threaded my machine up with a nice contrasting red thread (put your sunglasses on!).
Ideally top stitch is done with a proper top stitching - or button hole twist - thread. This is a heavier weight thread that really stands out. I used Gutterman branded thread. You need only thread the spool - the bobbin can take normal weight thread.

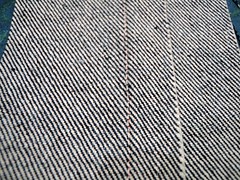
From the right side of the fabric, I then sewed a single (relatively!) straight line parallel to the seam edge. See how well the top stitch thread stands out?
For a fancier effect you can do double top stitching - two parallel lines.
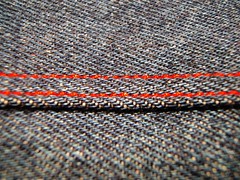
You can sew the lines separately, but the easiest way to create a double row is to use a twin needle.
If you haven't tried one of these before they are great fun. They come in a variety of types and gauges (e.g. stretch, universal, jean), as well as having varying distances between the needles.
Aside from the twin needle (shown below) you do need a second spool pin on your machine. Initially I had to hunt around on my Janome, working out what to do. Some machines have a fixed second spool pin, but on my machine the vertical second pin is a little attachment.

Once you have set up your second spool pin, you pop both reels on the machine (I
Note: It is possible for the two threads to get tangled and break during sewing. It can get UGLY! To minimise the chance of this happening, pass the thread down separate sides of the little tension disc near the top of the machine, when you are threading. Try also to sit the reels on the spool pin so one winds clockwise and the other, anti-clockwise.
Finally, as you sew you will see two beautiful evenly spaced lines of stitching appear. On the reverse size of the stitching, you will see a sort of zig-zag stitch that passes between the two lines. This is because you have only one thread available from the bottom (bobbin).
Bound seam
The seam is created by binding matching the wrong sides of the fabric together and then enclosing the seam in bias binding. I have tried this on a couple of bags. It works nicely where the seam doesn't need to be opened out flat and gives a clean finish to the inside of the seam.
For this finish you need a length of purchased or handmade double-fold bias binding.
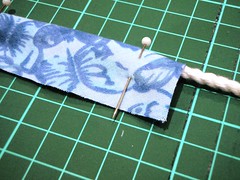
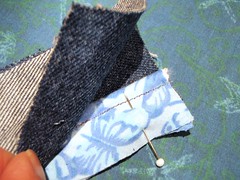
In the example below, I matched the wrong sides of the denim fabric together.

Next I open one side of the bias binding out and matched its edge with the edge of the seam allowance. I then pinned it in place.
The next step was stitch all the way along the fold line on the bias binding.
Once this was done, I carefully turn the free edge of the binding over, to enclose the the whole seam edge. Again, I pinned the binding in place.
Finally I "stitched in the ditch" - that is the little dip where the denim fabric and the binding met. This caught in the binding on the reverse side.
Et voila! A nice neat bias bound seam.

Piped seam
Piping is a tube of bias-cut, decorative fabric that you sew into the seam. There are two sorts: flat (just the fabric tube) and corded (where the tube wraps around a piece of cord). For my sampler, I decided to try making corded piping. You can purchase different-sized piping cord from haberdasheries.
To begin, I cut a strip of fabric on the bias. If you have a long seam and need lots of piping, you will almost certainly need to join the fabric strips end-to-end. Its a very similar process to making bias binding - see here for some photographs demonstrating how to attach the ends.
The width of the strip needs to be great enough to enclose the cord and leave a 1.5cm [⅝"] seam allowance.

Next, I enclosed a piece of cord and matched the raw edges of the fabric strip. I then pinned it to hold the cord in place.
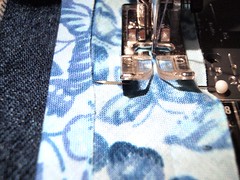
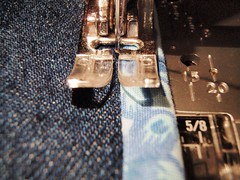
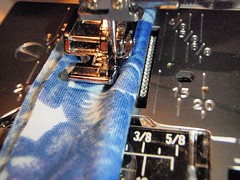
Then, I attached a zipper foot to my machine and positioned it to the left of the needle. A zipper foot allows you to sew close to the cord. (There are also special piping presser feet you can buy for different machines).
A word of warning ... in my excitement/naivety I sewed a little bit too close in to the cord! See how close the needle is? Whew - I sewed up that cord within an inch of its life!!
The wise sewer would leave a wee gap, so that one additional row of stitching can be added between this stitch line and the cord, when sewing the actual seam later.
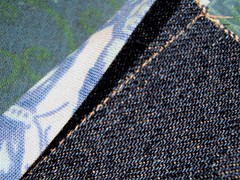
Finally I sandwiched the piping between the fabric, with the right sides of the denim together. The cord faced away from the seam allowance. Then I stitched the seam.
After turning the seam right-side out, the pretty, rounded piping is visible.

Channel seam
This is a very cute seam - certainly something a little bit different. I chanced upon it this week while reading through a reference book. Its classified as a top-stitched seam, but has an interesting twist.
To begin, I machine basted a plain seam (using nice long stitches), then pressed the seam allowance open.
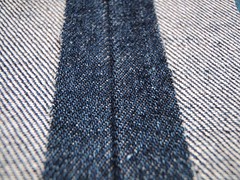
Next I cut a strip of fabric the width of the seam allowance and length of the seam. Matching the right side of the strip with the wrong side of of the seam, I pinned the strip in place. You can choose a matching or a contrasting fabric.

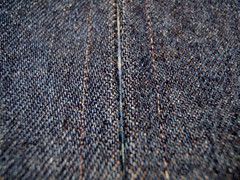
Then I flipped the fabric to the right side and top stitched through all the thicknesses, along both sides of the seam. In the picture below, you can see that I have already sewed down the right-hand side.

And finally, I carefully remove the large stitches from the machine basting, using my seam ripper. This opens up the "channel".

Here is the finished channel seam.
Peek-a-boo!
Conclusion
I will definitely use all these decorative finishes again. They are all quite straight forward, though I would like a little more practice with piping, to make sure I get the stitching in just the right place. The channel seam was a definite favourite, so now I am on the look-out for the right project to use it with.
Do you have other decorative seam finishes that you like using?
Next week: This is the conclusion of the seam-along. I've had great fun putting my sampler together - I hope its been useful to you too. I am on a roll now, so next week I will be starting a hem sampler. Stay tuned for details of the types of machine and hand sewn hems that I will look at. If you would like to hem-along with me, you are most welcome! Update: Hem-related articles can be found over here.


Liesl, this series has been just SO impressive! You are so thorough and so methodical and explain everything beautifully. What a marvellous resource! Glad that you're feeling better too (have missed you).
ReplyDeleteYep...what Lara said.
ReplyDeleteYou've done a wonderful job. You've carefully researched, tested and reported.
Looking forward to your hem series.
Ahh, is someone paying you to do this? Non? WELL, THEY SHOULD BE!!!! Fabulous, just fabulous. XXOO
ReplyDeletePS. My word verification is 'hemed'. How did you arrange that? ;)
Thanks for the tutorials. As you know I have used them on a real project already. I would like to use a double needle as I did my stitching by eye and it can get a little jiggy!
ReplyDeleteThis is soooo precious! Wonderful resource!
ReplyDeleteThanks a lot, Liesl!
I’m really enjoying the design and layout of your blog. It’s a very easy on the eyes which makes it much more enjoyable for me to come here and visit more often. Did you hire out a developer to create your theme? Great work!
DeleteLove the channeling!
ReplyDeleteThanks for this series! I know I will be back time and again for instruction. And a hem series sounds great!
ReplyDeleteThis has been a great series. thank you!
ReplyDeleteWow what an amazing job you have done with this seam series.
ReplyDeleteThere have been times when I have thought piping would make a nice touch in something I have been sewing but have been too scared to try - I might just give it a go now.
Will definitely bookmark this for future use.
Thanks.
Looking forward to hems now!
You have done such an amazing job on this series. I envy your sewing skills and your patience and your diligence. If anyone ever asks me how to sew, I'm sending them to your blog and this series. Congratulations on such an extensive, well thought out and clearly presented set of tutorials.
ReplyDeleteyour a star! this is wonderful and i want to go doing some piping now! thanks so much!
ReplyDeleteoff to study the curve one now..!!
Thank you so much for your tips! Very helpful.
ReplyDeleteWhat an awesome resource!! I'm bookmarking in my reader for my own use, but I also posted a link to your tutorial on Craft Gossip Sewing Blog:
ReplyDeletehttp://hoppobumpo.blogspot.com/2009/03/seam-along-week-9-final-decorative.html
--Anne
This was fantastic- Thank you!
ReplyDeleteThank you SO MUCH for all these great samples and instructions! Taccolina mentioned your flat-fell seam tutorial yesterday and I'm so excited to find so many other seam ideas as well. Thanks!
ReplyDeleteI like so much your decorative seam, I really appreciate your wonderful different and creative ideas, your blog always enlightens me and makes me want do all your projects!
ReplyDeleteHello really I like your blog.... it's an excellent blog post found here...Thanks very much for the share... I'm going follow your blog.kamagramg100mg online
ReplyDeletewow great i have read many articles about this topic and everytime i learn something new i dont think it will ever stop always new info , Thanks for all of your hard work!fap turbo
ReplyDeleteThis is what I have been searching in many websites and I finally found it here. Amazing article. I am so impressed. Could never think of such a thing is possible with it...I think you have a great knowledge especially while dealings with such subjects.
ReplyDeleteI read your blog on daily basis.This post is awesome in between all the posts.I wanna say heartiest thanks to you for this.
ReplyDeleteRegards,
generic viagra
Wow! It's awesome blog post here.... really very interesting for reading.....
ReplyDeleteturbulence training
Wow!!Great designer tutorial.Very creative post.Impressive resource.Wonderful post!!
ReplyDeleteWeek 9, great job, keep it going!
ReplyDeleteThanks very much for sharing this interesting blog post. Keep posting such an amazing blog post. Thanks very much!
ReplyDeleteGreat resource, well explained, thanks
ReplyDeletegood fabrics...
ReplyDeletehey nice post thanks for sharing
ReplyDeleteGreat work man.I am hardly a person who reads some stuff but your writing style glued me to the article.
ReplyDeleteThis is an amazing blog post here... Keep updating your blog. Thanks a lot for the share.....
ReplyDeleteThis is a nice post shared here. Great job done and thanks for sharing this post.
ReplyDeleteI needed, without telling lies, I have more than 2 hours of looking for any information like this. In my college work needed to review articles online,
ReplyDeletehello, i think that you need to add more images or something similar.
ReplyDeleteHi Everybody,
ReplyDeleteYou really did a great job. I found your blog very interesting and very informative. I think your blog is great information source & I like your way of writing and explaining the topics. Keep it up. I'm going to follow your blog.
regards..
astermeds.com
Awesome blog. I enjoyed reading your articles. This is truly a great read for me. I have bookmarked it and I am looking forward to reading new articles. Keep up the good work!
ReplyDeletePlease continue to write more because it’s unusual that someone has something interesting to say about this. Will be waiting for more…
ReplyDeleteI like it a lot. Thank you for sharing.
ReplyDeletethis blog is so interesting and fun to read.. thanks for sharing it with us..
ReplyDeleteGood steps have been used in this article. By giving these type of examples we can easily understand what the writter is saying in this article.
ReplyDeleteGreat post! Keep it up the good work and also keep posting.
ReplyDeleteGreat!!post thanks for sharing.....
ReplyDeleteIf you need more traffic to your site to check the website on my part. It 'really helped me, and I think it can help your site.
ReplyDeleteI just wanted to comment on your blog and say I really enjoyed reading your blog here. It was very informative and I also digg the way you write! Keep it up and I'll be back soon to find out more mate.
ReplyDeleteI'm going to cue up your blog so that I can read more later. I have a page that you might like that I set up for total beginners such as myself..
ReplyDeleteSuch a wonderful post. Thanks for the share. It was very interesting and informative.
ReplyDeleteKamagra
Thank you for you efforts looking for this great list. Welcome to the do follow community I am hoping for a great work from you in the future.
ReplyDeleteHi , i got this Article , i was searching some thing relevant to this, And i am feeling lucky, as its the perfect one for what i am looking for. I will share this link on face book.
ReplyDeleteHi , i got this Article , i was searching some thing relevant to this, And i am feeling lucky, as its the perfect one for what i am looking for. I will share this link on face book.
ReplyDeleteEste es un tema tan increíble y útil que usted comparte con. Estoy satisfecho por la forma en que llevó a cabo ideas. Gracias por compartir.
ReplyDeleteThanks for taking the time to discuss this, I feel strongly about it and love learning more on this topic. If possible, as you gain expertise, would you mind updating your blog with more information? It is extremely helpful for me.
ReplyDeleteThis comment has been removed by a blog administrator.
ReplyDeletesophisticated collection and by the way the copy is written in such a nice way, i like it
ReplyDeleteNice post. I like the way you start and then conclude your thoughts. Thanks for this information .I really appreciate your work, keep it up and thanks for sharing information with me.
ReplyDeleteI mean, I have never been so entertained by anything in my life! Thanks for sharing such a nice post.
ReplyDeleteCool, Which seems to be very important and it made good time pass for me. I will always give a nice thrust look in to you from my bookmark feed. I don’t actually comment and don’t like to spend time in typing the comment.
ReplyDeleteExcellent post. I want to thank you for this informative read, I really appreciate sharing this great post. Keep up your good work
ReplyDeleteThe blog is to good and informative where i like to discuss about this in my blog thanks for sharing.
ReplyDeleteThank you for providing such a valuable information and thanks for sharing this matter.
ReplyDeleteGOOD and NEW factors, just create me experience fresh and dynamic. That is the miracle of your material .
ReplyDeleteBethesda Locksmith
I like so much your attractive joint, I really appreciate your amazing different and suggestions, your website always enlightens me and creates me want do all your projects!
ReplyDeleteCool, this seems to be very important, it makes good time pass for me. I will always show you the beautiful thrust from my bookmarks feed. I don't comment, don't like to spend time on typing.
ReplyDeleteRight here is the perfect website for everyone who wants to understand this topic. You understand a whole lot its almost tough to argue with you (not that I personally will need to…HaHa). You certainly put a new spin on a subject that has been discussed for decades. Great stuff, just wonderful
ReplyDeleteI think your tutorial is wonderful! Thank you for the great tutorial! Keep up the great work! bridal fabrics
ReplyDeleteThis comment has been removed by a blog administrator.
ReplyDeleteThis comment has been removed by a blog administrator.
ReplyDeleteThis comment has been removed by a blog administrator.
ReplyDeleteThis comment has been removed by a blog administrator.
ReplyDeleteThis comment has been removed by a blog administrator.
ReplyDeleteThis comment has been removed by a blog administrator.
ReplyDeleteThis comment has been removed by a blog administrator.
ReplyDeleteThis comment has been removed by a blog administrator.
ReplyDeleteThis comment has been removed by a blog administrator.
ReplyDeleteThis comment has been removed by a blog administrator.
ReplyDeleteJust wish to say your article is as amazing. The clarity on your submit is just great and that i could assume you are a professional on this subject. Well together with your permission allow me to snatch your feed to stay up to date with drawing close post. Thank you 1,000,000 and please carry on the gratifying work.
ReplyDeleteI am the best call Girls in Mumbai escorts agency. If you are searching any Escorts girls. So, don't think for more info Just browse our websites given below.
ReplyDeleterussian mumbai escorts
mumbai russian escorts
mumbai model escorts
model escorts in mumbai
mumbai escorts
ReplyDeleteIn the Pink City, you feel the longing for human companionship, for a beautiful lady on your arm every time you go to a party, or even somebody to spend a night with you and let you grasp the pleasures that often lie just a little out of our reach. Esc0rts service Jaipur
Thanks for shareing comments
ReplyDelete