
Introduction
Week 1 - double fold hem (wovens)
Week 2 - single fold hem (wovens)
This week I looked at how to create hems on stretch fabrics. Stretch fabrics behave a little differently to wovens, so I had fun trying out some new techniques.
The right notions

Before starting my experiments I put a new ballpoint needle on my sewing machine. Stretch fabrics are constructed differently to wovens and universal sewing machine needles tend to puncture the fibres. This can result in holes and runs in the fabric. A ballpoint needle is much better for stretch fabric, especially knits. It has a rounded tip that pushes the fibres apart without cutting them.
Next I threaded my machine with a polyester thread. Cotton is generally considered bad news for stretch fabrics – as the fabric stretches, it is liable to break. Stick with polyester.
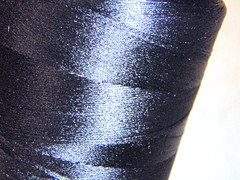
Some people also swear by using woolly nylon in the machine bobbin. Woolly nylon is a type of thread generally used for overlocking (serging). Its a whispy, shiny thread which will stretch a bit.
I purchased some for this experiment (I found it located with the big overlocking thread spools at the haberdashery).
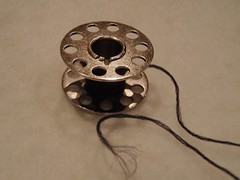
Most of my reading recommended winding the bobbin by hand to avoid overstretching the thread.
The raw edge
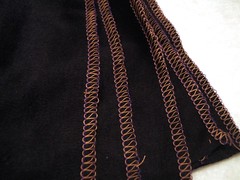
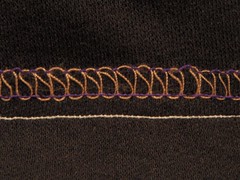
Stretch fabrics tend not to fray like wovens. If you do need to finish the raw edge the same methods I looked at in week 2 - zigzag, overlocked and hand overcast - would be suitable. This week I used a 3-thread overlock stitch on all my hem edges (below).
Choosing the right finish for the hem
Stretch fabrics typically have somewhere between 20 and 75% stretch (with Spandex even higher), so one of the main considerations is to choose a finish that allows the hem the right amount of "give". This means considering how stretchy the fabric is, as well as where the hem is placed.
A skirt hem on a low stretch fabric, for example, won’t need as much “give” as say, the neckline on a very stretchy fabric. A different technique can be used with each. I’ve looked at 4 possibilities below.
In the illustrations below I used a bit of very cheap remnant that I picked up in a discount store. This poly-blend, one-way stretch fabric was probably the nastiest I have ever used. It was horrible to sew on, had poor recovery after being stretched and actually frayed. Urggh!
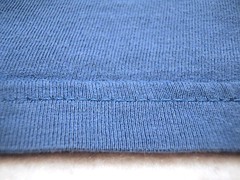
Straight stitch
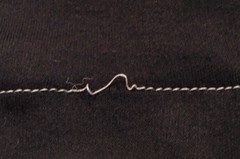
The first possibility is to take up the hem with a single line of straight stitching. It’s an option that is not suited to all hems. Straight stitching has little “give” so its best used where the fabric has lower stretch and the hemline doesn’t need to stretch too much.
In my example below I overedged the raw edge, then turned and lightly pressed the hem and secured it with a line of straight stitch
Then the stretch test. Oh dear - immediate breakage!
The greater the stretch, the more thread – and therefore stitches - you need. Too few and your stitching will snap like mine did. You can increase the number of stitches by reducing the stitch size.
The hem performed a little better after I reduced the stitch size considerably (see below). And even better with the addition of woolly nylon thread in the bobbin. It still wasn't very stretchy, but there weren't any more breakages.
Zig-zag
Most modern sewing machines have stitches that are specifically designed for stretch fabrics (for example, “lightening” stitch). You can however simply use a plain old zigzag stitch, which I tried below.
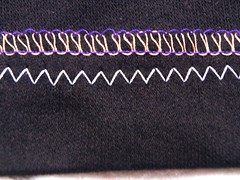
Again, I over-edged the raw edge, turned and pressed the hem and then stitched. The zigzag has built-in "give" in it. At the extreme when stretched to its fullest extent the stitch would start to look straight.

The zig-zag stitching survived the stretch test well. Woolly nylon performed slightly better in the bobbin than regular thread, but both stretched well.
Coverstitch
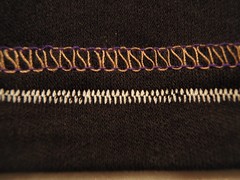
Are you wearing a t-shirt? Take a look at the hem. Chances are that it has been finished with a coverstitch. It comprises two or three lines of parallel topstitching on the outside ....
... and an overlock stitch over the raw edge on the inside.
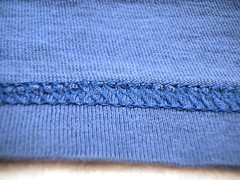
This stitch is used widely in the commercial world. To use it in home sewing you need a special machine – either a coverstitch machine or an overlocker (serger) with a coverstitch option. Many of the higher-end (read: expensive!) overlockers also provide this special stitching.
Sadly my overlocker cannot coverstitch. However, there is something you can do with a regular sewing machine to create a “faux” coverstitch. Read on!
Twin needle
A twin needle can be used to create a double row of top stitching on your hem. As the name would suggest, this clever gadget has two needles sitting side-by-side on the one shank.
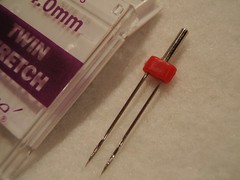
You simply pop it on your sewing machine, add a second spool of thread and thread both needles. Et voila: you’re ready to sew two perfectly spaced lines of straight stitch. (You may need to consult your sewing machine manual about adding the second spool).
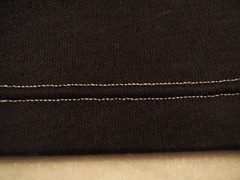
Like all things faux, once you look a little deeper, you will see that the stitching isn’t really quite like a coverstitch at all. Instead of overlocking on the underside, there is zigzag stitch running between the topstitching. This zigzag is, however, beneficial as it allows a bit of stretch in the hem.
Note: It is possible for the two threads to get tangled and break during sewing. It can get UGLY! To minimise the chance of this happening, pass the thread down separate sides of the little tension disc near the top of the machine, when you are threading. Try also to sit the reels on the spool pin so one winds clockwise and the other, anti-clockwise.
Averting disasters
Tip #1 – if possible, try sewing on a scrap of fabric first, to see how your stretch fabric will behave
Tip #2 – if you are using a very fine stretch fabric and the twin needle starts to create an ugly ridge effect, the fabric is slipping. Try adding some fusible hemming tape inside the hem before stitching.
Tip #3 – if your stitching looks puckered, try putting a piece of tissue paper above and below the fabric while you stitch. This will help the fabric glide under the presser foot and avoid it being dragged down into the needle plate. Tear the paper away when you have finished.
Conclusion
After this experiment, I wouldn't bother too much with straight stitch - it really isn't forgiving enough. Both the zig-zag and twin needle stitching worked well. I really like using the twin needle – I think it creates the nicest of all the sewing machine finishes. Of course, I could always keep the coverstitch machine on the wish list ...
Next time: Next time on hem-along, I will be looking at how to blind hem by both hand and machine.


Thanks! Could you show us a picture of "pass the thread down separate sides of the little tension disc near the top of the machine" I'm too much of a visual learners to figure out what you mean HAHA! I have an idea but I don't know if I'm thinking rightly.
ReplyDeleteI really look forward to seeing the blind hem stitch on a machine. My sewing machine book doesn't make any sense to me on that one!
Thanks for another great lesson Liesl. I think I might buy one of those double needles just to have a play around with decorative topstitching!
ReplyDeletesewing stretch fabric scares me lol this is very helpful thank you!
ReplyDeleteLiesl, I really like the way you do your tutes. It's good to see how someone works through the process.
ReplyDeleteWhen I hem knits on the sewing machine, I also use my walking foot because it helps to prevent it stretching. I am spoiled and also have the option of lowering my presser foot pressure, but prefer using the walking foot.
Thanks for the nice comments!
ReplyDeleteSarah,I will see if I can get a picture of the tension disc (this will test my photography skills!)and update the post.
Sara, thanks for adding the walking foot tip.
Another great lesson - you inspired me to try new things on my machine and see the results too - i am now trying out all my different feet and writing about them, i don't know what a Walking Foot is though! I'm off the find out.
ReplyDeleteThanks so much for sharing your knowledge and experience :-)
Fabulous. Thank you!!
ReplyDeleteI am finally getting down to my own t-shirt making attempt. Again. now that my machine is serviced and I have time. I was wondering what the difference is between 3 thread vs 4 thread overlocking is on stretch hems? My manual suggests 3 thread for hemming, but I wasn't sure *why*... any hints? I'm just lazy and don't really want to thread/re-thread my overlocker unless I think there's a justified reason for it, hehehe ;-)
ReplyDeleteBeth, I definitely understand the bit about being lazy and not wanting to rethread the overlocker! With the four thread stitch the left-hand needle creates a row of stitching for a seam, while the right-hand one overedges. If you are just overedging, you only need the right-hand needle (which is three thread overlocking). I'm slack and often use the four thread regardless!
ReplyDeletegood job. i really liked your help!
ReplyDeleteYour lesson has given me the confidence I needed to give it a try. I was just 'this far' from breaking down and buying a cover stitch machine just for heming stretch fabrics. I'll let you know how it turns out.
ReplyDeleteDK MS
I know this post is really old, but I found it helpful! I am worried that the twin needle is going to cut the threads of the fabric and make holes... do they sell twin needles with ballpoint ends?
ReplyDeleteThanks for sharing these techniques! I love using the zigzag stitch it's the easiest to sew with. For some reason the footer on my machine doesn't work to well with the "overlock" stitch feature, which is a bummer!
ReplyDeleteThankyou so much for your blog, i learnt so much. it was really helpful. THANKKSSSSSS ::))))))
ReplyDeleteThis is a great article! Just what I needed!
ReplyDelete