
Introduction
Week 1 - basic double fold hem for woven fabric
Single-fold hems
Welcome to my continuing experiments in hem-along. This week I looked at creating single fold hems on woven fabrics.
This type of simple hem is produced by folding the up the allowance once to the wrong side of the fabric. Single-fold hems are good for a range of different weight fabrics, including heavier ones where a double fold hem would be too obvious or bulky.
To create the hem below, I made a turn then lightly pressed the fold. (The hem depth that you choose will depend upon your project.) To hold the hem before securing it with stitching, you need to either pin or baste the hem in place.

The raw edge
When using a single fold hem, the raw edge of the fabric remains exposed. (By contrast, a double-fold hem encloses the raw edge in the folds).
Now if the fabric edge is a selvedge or the fabric is not prone to ravelling, all you need to do is fold, then stitch the hem. Fabrics such as knits and non-wovens (e.g. suede, felt) tend not to fray when cut. Wovens - which I was looking at this week - generally fray to some degree on any cut edge. The looser the weave the greater the amount of fraying. I once had a piece of linen that fell apart if you took a sideways glance at it!
When the fabric is prone to ravelling, then the hem edge needs to be finished in some manner to prevent fraying.
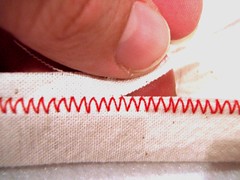
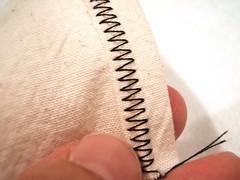
One method is to use a zig-zag machine stitch. In the example below I stitched parallel to the raw edge of the fabric and then used sharp scissors to cut close to the stitching to remove the excess (ravelling) fabric. When you do this, its best to test the zig-zagging on a scrap of material to make sure the length and width is suitable. The wrong settings can produce a stitch that gathers your fabric into an ugly little ridge. After zig-zagging, you can then secure the hem by hand or machine.
If you have an overlocker you can serge along the raw edge, before securing the hem by machine or hand. A three-thread stitch will finish the edge securely. In the example below, I'm afraid I have been a wee bit lazy. I already had four threads set up on the overlocker (used for overedging and stitching a seam in one go) and couldn't be bothered taking out the left-hand needle. So instead we have a four-thread stitch.

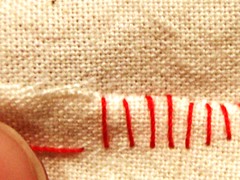
If you would like to finish the raw edge by hand, you can use an overcast stitch. This is an evenly spaced diagonal stitch that runs across the raw edge of the fabric. The more prone your fabric is to ravelling, then the closer together the stitches.
Of course, if your hand stitching looks anything like my oddly-spaced, strangely-vertical stitching below, you may prefer to use your sewing machine. (I should be too ashamed to show you this picture, but I thought I'd leave it in for its comedic value!)
Securing the hem
To secure the hem, you can use either machine or hand stitching. There are also some "quick-and-dirty" sewing-free ways of securing a hem, which I have covered a bit further on.
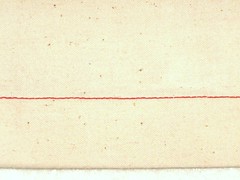
You may choose to secure your hem by machine with top-stitching. Below is an example of top stitching, which I tried last week. To see how to do this in more detail, click here.
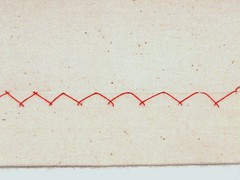
Alternately, you may wish to secure the hem by hand. A good stitch for securing the hem (after finishing the edge) is a catch stitch. Below is an example of catch stitching, which I also tried last week. To see how to do this in more detail, click here.
Another neat solution combines the finishing and securing in one step, using a machine zig zag stitch. You do this by stitching the turned up hem, then trimming the excess fabric back close to the stitching.
Cheat's methods
Here they are. Shortcuts for securing a hem:

From top to bottom: [1] Double-sided bonding tape,
[2] Iron-on hemming web and [3] Hemming tape
- Double-sided bonding tape
This sturdy, clear adhesive tape joins the fabric together. No sewing or ironing is needed. The tape is placed on the inside of the fold and is not visible. The raw edge of the fabric remains exposed. - Iron-on hemming web
This cobweb-like, fusible tape joins fabric together. The web is placed on the inside of the fold and is not visible. No sewing is needed. The webbing fuses using the heat of an iron. The raw edge of the fabric remains exposed. - Hemming tape - this mesh tape is ironed over the top of the hem edge. After moistening the tape, it is placed white-side down over the hem edge and ironed in place. The tape is visible, but the raw edge of the fabric is covered.

The fusible webbing is less visible and would work as a no-sew solution on fabrics that aren't prone to fraying
And the double-sided adhesive tape? Hmmm - what to say? Ah, how about: I wished I had discovered this years ago when I was wasting perfectly good staples on hems? It has to be the quickest way possible to secure a hem. Its not pretty, but does the job ... kind of. It does produce quite a stiffly finished hem. Does anyone know if that tape ever stands up to laundering or ironing?
Conclusion
I would love to have the skill and patience to hand overcast a hem edge, but suspect I will be content to stay with zig zagging and overlocking. I was, however, excited to discover the all-in-one zig zag finish and stitch. Now to find a place to use it!
Next time: I am moving from woven fabrics to stretchy fabrics. Come back to see my s-t-r-e-t-c-h-y hemming experiments.


I've never heard of hemming tape. *blushes* I've always just hemmed by hand or with a zigzag stitch. But if it does work and save time then I will have to try it out.
ReplyDeleteI'm a sucker for the bottom three types of hemming! I particularly like that fusible hemming tape to cover my mistakes.
ReplyDeleteI actually have an unhemmed stretchy skirt awaiting your tutorial
ReplyDelete