Introduction
Preface
Whether a sewer or not, most us have been faced with a hem at some point. Who hasn't had to do something with a hem that has come down? Or shorten a garment? I suspect this is why hilarious stories of make-shift hemming solutions seem to spill out so readily. I'll personally admit to stapling, taping and pinning in the past. And then - when I became a little more sophisticated - to the extensive use of iron-on tape.
This week was the first in my hem-along and I decided to start with the most basic of techniques - the turned and stitched hem. But you know, after years as a serial stapler, it came as a great surprise to discover many variations on the humble folded hem. So many, in fact, that I thought it best to look at the different possibilities in detail across the next couple of weeks.
So this week, I decided to focus just on how to hem a straight line on woven fabric using a double fold hem. In the coming two weeks I will look at single fold hems on woven fabrics and then some good techniques for hemming a stretchy fabric. Later I will also look at hemming curves.
Read on to see my double-fold experiments using machine and hand sewing.
Double-folding a hem
This type of hem is created by folding the up the hem allowance twice. This hides the raw edge of the fabric in the fold.
It creates a simple, durable hem best suited to light (but not sheer) to medium-weight fabrics. The folds create some weight at the hemline. (If your hem is going to become bulky or heavy when the fabric is turned twice, it would be better to use a single fold, which I will be looking at next week.)
To create the hem below, I made the first turn then lightly pressed the fold. After this I made the second turn and lightly pressed the fold.
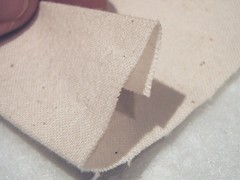
The depth of the double-folded hem will depend on your project.
If you are making a garment like a dress, you'll find that the skirt hem is much deeper than say the hem on the sleeve. If you are using a commercial pattern, there will probably be guidance about the size of the first and second folds for each hem. The first fold is, however, generally shallower than the second. This minimises the bulk in the hem.
To hold the folds in place, you can see below that I pinned the hem.
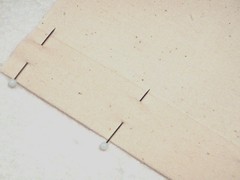
You can also baste (temporarily tack with a long hand stitches) the hem. There are some instances (that I will look at in coming weeks - for example, curved hems) where it is better to hold the hem in place with basting rather than pins.
Securing the hem by hand
Most of the hems I have sewn in the past have been by machine, so it was good to try out some new hand stitches. When you catch a hem by hand, the stitching is less visible than machining.
There are a number of hand stitches that can be used for hemming. Some of the common ones are blind hem stitch, catch stitch and slip stitch. I will be looking at blind hemming by hand and machine in a separate experiment, so this week I tried out catch and slip stitch.
For each of the stitches, I used just a single thread in the needle. The thread was secured at the start and end of the stitching with a knot in the fold.
Catch stitch
Catch stitch criss-crosses the length of the hem. You use small stitches to catch fabric both above and below the folded edge. This is a nice secure stitch, which has a little bit of "give" in it. A little movement in the hemline makes the hem look soft.
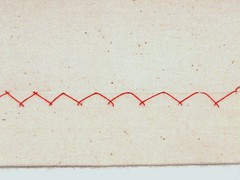
If you use a matching thread, the stitch will be barely visible on the right side of the fabric. The stitches you can see below are the small stitches taken above the fold.
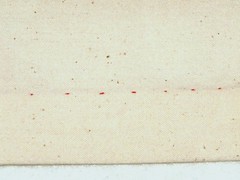
When using catch stitch you sew from the left to the right along the hemline. The stitch is worked by catching a small stitch (right to left) in the fold and then moving diagonally up to catch a small stitch (right to left) above the fold. In the example below I am about to pull the needle to the left and then move diagonally back down to the fold again.
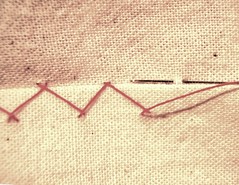
Now this is quite a straight forward stitch, but hand stitching really is not my forte. I had a little trouble catching-on initially and picked up some of the stitches in the wrong direction. I found it a little easier when I remembered that I was essentially sewing in a figure 8 with the top and bottom of the 8 being where I should take the stitch.
Slip stitch
Next I tried slip stitch. It is created by taking a little stitch above the fold and then a longer stitch that tunnels through the fold. This is also a nice sturdy stitch, but has a bit less "give" than the catch stitch. It is, however, less visible from the wrong side of the fabric than the catch stitch, as you can see below ...
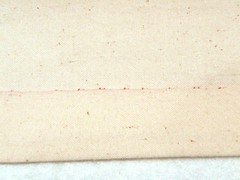
... but looks similar on the right side of the fabric. Once again if you used a matching thread the stitches would be almost invisible. And again, the little stitches you can see are the ones that have been taken above the fold.

When using with slip stitch you sew from the right to left along the hemline. The stitch is worked by using the fold as a little tunnel. You start by taking a "tunnelling" stitch to left in the fold and then bring the needle out and take a little stitch (right to left) above the fold. Then you take the needle down into the fold and move left again.
In the example below, I have loosened off the stitching slightly to show you what is happening. I am about to take the needle back down into the fold again.
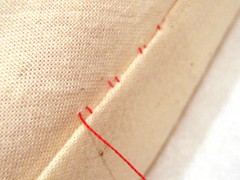
So its an along-up-across-down-along sort of pattern.
Securing the hem by machine
Machine stitching is a quick way of securing the hem and produces a very durable, even stitch. The stitching is generally visible from the right side of the fabric - even when you use a matching thread. For this reason, this type of hem is often referred to as a "top-stitched" hem.
Top stitching is always done on the right side of the fabric, so strictly speaking, you should sew the hem from the outside of the garment. The catch is that you need to be quite sure that you are securing the hem up all the way round with your stitching. There is not much point in having a line of beautiful top stitching if its not actually fastening the hem.
Given this, some people choose to sew on the wrong side of the garment. I'll admit it ... I am one of those people! If you are going to do this, you need to make sure that you are also sewing parallel to bottom of the hem, otherwise your stitching is going to look all wobbly from the outside.
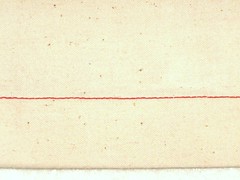
Here is my hem secured with machine stitching.
Additional tips
#1 If you have any vertical seams intersecting with your hem, they will create extra bulk in your hem. The heavier your fabric the more pronounced the effect. Instead of the double fold hem having three thickness, it will have six! Before you begin sewing you could take out a little bit of bulk by cutting the seam allowance to about half its size (you can read more about "grading" a seam here).

#2 If you are hand sewing, its a good idea to create a knot every now and then as you are stitching. This means if the hem starts to come down later, it will only undo up to the knot. This way you won't have to re-stitch a whole hem!
Conclusion
Before this experiment I rarely hemmed by hand. I shied away from the whole idea, thinking it was too difficult. Securing a hem by machine has always seemed like the quickest, easiest and safest thing to do. However, after trying the catch and slip stitches, machine stitching seemed so heavy and obvious. I think I might be a convert!
Next week: I will be looking at single fold hems and how you finish the raw edge of the hem. I will be using both the sewing machine and hand sewing. And ... shhhhh, don't tell anyone .... but I might even dabble with a cheat's no-sew hem or two.




I have never hand sewn a hem. I always thought that the machine looks better (because the stitch length is even and my stitching never is). But perhaps I will give it a try next time. Thanks for the tute!
ReplyDeleteyep...stapled hems here too.
ReplyDeletegreat work here...have always hand sewn hems because always felt it was a better finish and did not want the sewing showing, however with my jersy dress I machine sewed the hem and it looked good. i suppose it depends on what sort of finish u want
ReplyDeleteThis has been a very helpful article. I am new to hand sewing and find this article very useful. It is amazing how hard it is to find a good article that will show you what you need to be doing - ESPECIALLY when you don't know what to google. THANK YOU!!
ReplyDeleteI think this is one of the most important information for me. And i am glad reading your article. But should remark on few general things, The website style is perfect, the articles is really excellent : D. Good job, cheers
ReplyDeleteRight here is the perfect website for everyone who wants to understand this topic. You understand a whole lot its almost tough to argue with you (not that I personally will need to…HaHa). You certainly put a new spin on a subject that has been discussed for decades. Great stuff, just wonderful
ReplyDeleteI am really impressed with your writing skills as well as with the format to your blog. Is this a paid topic or did you modify it yourself? Either way keep up the excellent high quality writing, it is rare to peer a nice weblog like this one these days..
ReplyDeleteI have to search sites with relevant information on given topic and provide them to teacher our opinion and the article. where to buy hemp buds
ReplyDelete