
Introduction
Week 1 - simple edge finishes
Week 2 - French seams
Week 3 - Bound seams
Of all the seam finishes I've tried so far, the flat fell has been the one I approached with the greatest trepidation. Whilst well acquainted with the concept of fell flat (as in "I just tripped over and fell flat on my face"), flat fell finishes sounded rather more complicated. I need not have worried.
Flat fell seam finish
If you have a look at your jeans or other trousers you might just find a flat fell seam finish. Like the French seam, this finish encloses the seam allowance. It provides a very tidy finish that is also extremely strong.
To create a flat fell, put the wrong sides together and stitch. The seam allowance will be on the outside of the garment, as below.
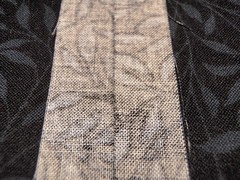
Press the seam to one side and trim the top side of the allowance back by half. In the picture below I have pressed the seam to the left and trimmed away the right-hand side of the seam allowance.

Fold the larger seam allowance inwards, enclosing the the trimmed seam allowance. The picture below shows the left hand seam allowance being folded to the right and wrapping round the right-hand seam allowance.

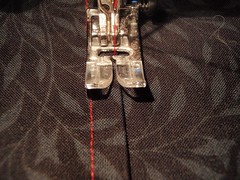
Push the seam allowance to the side to complely hide the raw edge (in the example below, I pushed it to the right). Stitch in place, from the right side of the fabric. The trick is to sew as close as possible to the edge.
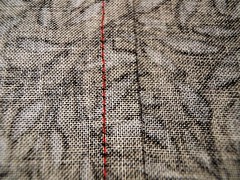
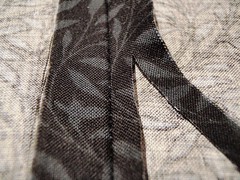
The flat fell seam is finished. The right side of the fabric looks as good as ....

... the wrong side. Wouldn't this be perfect for reversible garments?
Welt seam
The welt seam gives a similar look to a flat fell seam. Its beauty however, is that it creates a much less bulky seam, which is very useful if you are using very thick or heavy fabric.
To begin, place the right sides of the fabric together and stitch.
Trim away about half of the allowance on one side of the seam. In the picture below I have trimmed the right hand seam allowance.
Flip the longer seam allowance inward and press the seam to the side. In the picture I have taken the left-hand seam allowance and pressed it to the right.

Baste the seam allowance into place through all the layers of fabric.

Top stitch the seam into place from the right side of the fabric. Remove the basting thread.

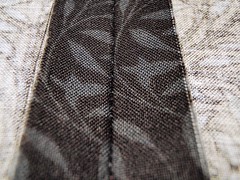
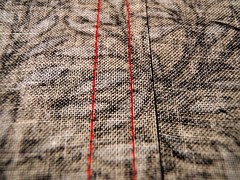
The welt seam is finished. From the outside of the garment there is a ditch at the join and one line of stitching.

From the reverse side there are two lines of stitching.
Conclusion
I really liked the flat fell seam. It wasn't to difficult to create and really did have an amazing toughness about it. The finished seam also looked very smart. The welt seam I could take or leave - I wasn't particularly enamoured with the raw edge that it leaves on the underside. It wouldn't work at all well on fabrics prone to ravelling. Perhaps I have simply become a little picky after trying out a range of enclosed and bound seam finishes. In its defence however, it really was miles less bulky than the flat fell. It is a recommended seam for suede and leather, neither of which tend to fray. It would also be good for a non-fraying synthetic like polar fleece.
Have you been seaming-along? Which is your favourite?
Next Wednesday: Stay tuned next week, when I will be investigating how to create stable seams when using stretchy and bias cut fabrics. Read more about stabilising seams via Google.


Great instructions! Thank you. Son
ReplyDeleteI really like the flat fall seam. Great instructions too... it even made sense to someone like me who can't usually follow along!
ReplyDeletethis is wonderful!! i learnt the fell seam just before christmas, its like the seam they use on jeans.
ReplyDeleteThese seams are great..it seems! loving these tutorials. I used a french seam for the time last night making bags for a project for the bushfire victim kids. It worked well coz it gave a nice clean seam for an unlined bag. Thanks for teaching me!
ReplyDeleteYet again, a wonderful job done! I do like flat-fell seams. They definitely have their place!
ReplyDeleteThose flat fell seams are awesome! I am planning on making some pants for Moo and I think I'm gonna give them a go. You're tute is really easy to follow - you rock!
ReplyDeleteI've never heard of such a seam... but it looks useful! I can't wait for next week's installment!
ReplyDeleteThanks so much for the seam instructions. I have never been taught how to do stuff like this so I am bumbling along on my own. I have now made a pair of linen dungarees for my grandson using the flat fell and it worked a treat! Thanks very much. I will give you 'big up' on my blog for that.
ReplyDeleteCheers!