
I do love the name concealed zipper. It sounds all covert and dangerous. I can just imagine the movie scene now ...
Ma'am ... drop the pinking shears and put your hands in the air.
Quick cuff her and check for any concealed zippers.
Hmmm ... I digress ... back to sewing ...
Hmmm ... I digress ... back to sewing ...
If you haven't tried one of these babies out before, there are a few things you need to know before starting. The concealed zip is added before sewing the rest of the seam. You need a zipper that is marked as an "invisible" or "concealed" zipper. It will have the teeth running on the underside of the zip (the flip side to the zipper pull). For machine sewing, you also need a specific concealed zipper foot.
Anyway, here's what I did.
The first step was to attach the zipper to the right-hand seam allowance. My right-hand seam allowance belonged to the back of the cushion (red fabric). After opening the zipper fully, I placed the right sides of the zipper and fabric together, aligning the zip in the seam allowance. (I suffer from some spatial awareness issues, so this step took me quite a long time.) I then pinned and basted.

Using the special sewing machine foot, I then sewed the length of the zip from top to bottom. The zip teeth travel through the left-hand channel on the underside the foot. The needle needs to stitch very, very close to the teeth, so I rolled these outwards so that the needle could stitch in as close as possible. I stopped when I hit the zipper pull at the bottom!

The next step was to attach the zipper to the left-hand seam allowance. This was the front of the cushion, which is in the Daisies fabric. I placed the right sides of the zipper and fabric together, aligning the zip in the seam allowance. I pinned and basted again.

The next step was to attach the zipper to the left-hand seam allowance. This was the front of the cushion, which is in the Daisies fabric. I placed the right sides of the zipper and fabric together, aligning the zip in the seam allowance. I pinned and basted again.

Again, using the concealed zipper machine foot, I sewed the length of the zip from top to bottom. This time the zipper teeth travelled through the right-hand channel on the underside of the foot. I rolled the teeth out again, so that I could stitch in really close to the coiled teeth.

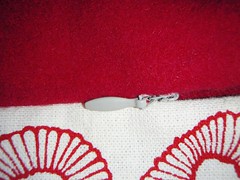
Finally I removed the basting and sewed up the remainder of the seam (to the left and right of the zip) using the regular machine foot. I also added a little hand stitch at the bottom of the zip to secure the seam. Voila! The zipper is indeed quite concealed in the seam.


I never use zippers, it seems difficult without a zipper machine foot! But I have to try - one day...
ReplyDeleteRather than sticking your finger in the path of the raging needle while trying to roll out the teeth, just iron the teeth out before you start. The nylon teeth don't melt, and it's sooooo much easier!!! :D
ReplyDeleteThis tip brought to you by Shortcuts Anonymous.
ommigosh.. I've spent all afternoon trying to work out the orientation of my damn invisible zipper and how to sew it in using various tutorials. And then I thought "hmmm I wonder if miss hoppobumpo has something on the matter!" and of course your explanations are much easier to understand. Ta!
ReplyDeleteHello, i think that you did a great job.!!!
ReplyDelete