
Introduction
Week 1 - Simple edge finishes
Week 2 - French seams
Week 3 - Bound seams
Week 4 - Flat fell seams
Week 5 - Taped (stabilised) seams
Week 6 - Overlocked seams
Week 7 - Bulky seams
Edit: Seam-along has now concluded. Click here if you would like to see all 9 weeks of posts.
To date in the seam-along, I have kept my seams strictly on the straight and narrow. This week, however, I decided to get more adventurous and see how to finish seams sewn on curves and corners.
The seam allowances on curves are shorter or longer than the stitch line, so need some assistance to sit flat. Likewise corners will not turn out to points unless you intervene.
Notching
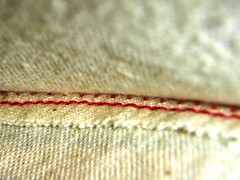
Notching is used on convex (outward) curves. I have sewn a convex seam below - you can see that the seam allowance is slightly longer than the stitch line.
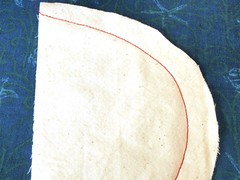
When the seam is turned you can see the effect this has on the seam allowance. Hideous! The seam allowance is too long to sit flat - instead it is bunching. This creates corresponding dimples along the right side of the seam.

To remove the bunching and create the proper rounded edge along the seam, you use a simple technique called notching. I tried this by turning the seam back to the wrong side and cutting small wedges out of the allowance. I used nice sharp scissors and being the klutz I am, made sure I kept well away from the stitch line.

After turning and pressing the seam, you can see that the allowance sits beautifully flat.

Clipping
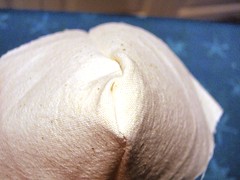
Clipping is used on concave (inward) curves. I have sewn a concave seam below - you can see that the seam allowance is slightly shorter than the stitch line.

My attempts to turn the seam right-side-out were almost completely futile - the short allowance to stitch line ratio, simply makes the whole thing too tight. In my example below you can almost hear the seam going B-O-I-N-G as it tries to flip back inward!

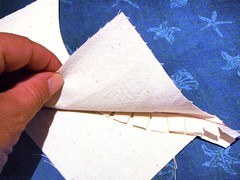
To fix this problem, you need to create more room in the seam allowance. This allows it to spread and sit flat. The technique you use is called "clipping". I tried this by turning the seam back to the wrong side and cutting small slits into the allowance. Once again I used nice sharp scissors and took care not to cut into the stitch line.

After turning and pressing the seam, the result is a nice curve ...

... with a seam allowance that sits flat.
Trimming
Another technique you can use on both convex and concave curves is trimming. This helps bring the the length of the seam allowance more into alignment with the stitch line. It can also help preserve some of the integrity of the seam. Clipping, for example, does relax a seam quite dramatically and in some cases you may not want this effect.
(For a very good explanation of when to use trimming rather than clipping and notching in garment making, see the March 2009 edition of Sewing with Australian Stitches vol. 17 no. 1. )
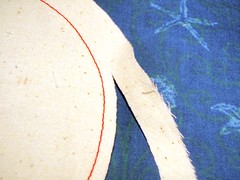
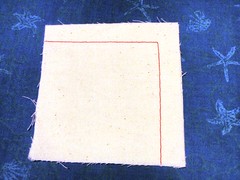
In my example below, I have trimmed the seam allowance. Generally you would reduce the allowance back to about half, but where the curve is tighter you might trim further.
Optional: The allowance could now be finished with one of the finishes that has been discussed in previous weeks. I haven't finished the seam allowance in this example, but a Hong Kong finish would have looked rather nice!
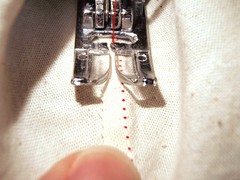
Optional: Next, in the picture below, you can see that I turned the seam to one side (the left) and stitched close to the left of the original seam line. This is called understitching and is a little bit tricky on a curve.
Why did I do this you ask? Well, it seemed like a good idea at the time. The Stitches article mentioned it and I thought I would give it a go! You don't have to do this, but it is a useful technique when you are making a garment. It keeps the seam allowance neatly in place and stops a curvy seam from rolling outwards. (Examples of curvy seams include necklines, armholes and waistbands). You turn the seam allowance and stitch towards the inner side of the garment.
The overall result is that the trimmed seam allowance sits nice flat (especially with that understitching) ...
... and a seam edge that has a nice clean curve. Beautiful! (Er ... well, as beautiful as a bit of curvy calico can be, that is).

Corners
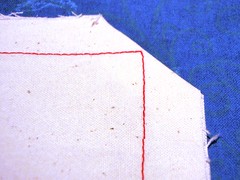
My final experiment this week was with a seam sewn around a corner.
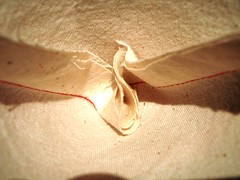
When the seam is turned right side out, it is almost impossible to get a nice point at the corner.
When we look back at the wrong side, it is easy to see why. Look at all that bunched up seam allowance, jostling for real estate in the corner!
To remedy this, I turned the seam back to the wrong side and removed some bulk by clipping off the point at the corner. Again I needed to very careful not cut through the stitching! For a more acute angle, you can trim away some of the seam allowance on both sides to taper it in towards the corner.
When the seam is turned and pressed there is a nice clean corner.

Conclusion
I think I would be more likely to use trimming for curves on garments, now that I know this works so well. If your fabric frays the allowance can then be finished with binding or an overedge stitch. Clipping and notching would work well where the seam is not exposed and inclined to fray.
What do you think? Clipping/notching or trimming? What do you do?
Next Wednesday: The series final - ta-dahhh! I will be looking at some decorative seams - including piping - just for fun.


I'm a bit embarrassed to admit this, but I think I might have been clipping and notching backwards for the last 8 months?! No one ever taught me and I followed a pattern which I won't name to prevent incrimating anyone. I'm going to have to do some experimenting now to see if I've really got it wrong...
ReplyDeleteYes, it's official. I've been clipping and notching backwards for the better part of eight months. I really should have invested in a proper sewing class, but your tutorial was fantastic for setting me straight. Yes, you can laugh this. I am!
ReplyDeleteI notch and clip corners the way you showed. I'm dying to know what camera you use to get such great macro shots!
ReplyDeleteI have said before I'm following you and learning with you.
ReplyDeleteThanks a lot for all those tutorials!
Love these tutes thanks - you really should put a book together! Secrets to sewing success!
ReplyDeleteI've just been trimming my seams, but I'm going to have to try out the clipping technique next time to see how it works for me. thanks :)
ReplyDeleteAnother great tutorial!
ReplyDeleteThank you so much for all of your tutorials! It's the next best thing to having a teacher standing right next to me! You have helped me move beyond beginner status to teach my daughters to sew their 4-H projects for fair.
ReplyDeleteGreat instructions and pics!
*ahem*... I may have been randomly butchering convex and concave curves with a mixture of random clips, notches and trims! Thanks for clarifying. You are the guru.
ReplyDeleteI've been following your seam-along and wanted to say thanks for your thoroughness. It's been very enlightening.
ReplyDeletethanks
ReplyDeleteRight here is the perfect website for everyone who wants to understand this topic. You understand a whole lot its almost tough to argue with you (not that I personally will need to…HaHa). You certainly put a new spin on a subject that has been discussed for decades. Great stuff, just wonderful
ReplyDeleteGood post
ReplyDeleteJetty
Cotton Bud
Kanopi
Atap Fiberglass