
Introduction
Week 1 - Simple edge finishes
Week 2 - French seams
Week 3 - Bound seams
Week 4 - Flat fell seams
Week 5 - Taped (stabilised) seams
This week I looked at overlocking - or serging - seams. I tried a couple of methods that create super-fast, beautifully neat seam finishes.
If you don't own an overlocker (serger), don't tune out just yet, as I also tested out a sewing machine alternative, just for you!
Overlocking
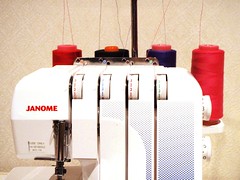
If you're not overly familiar with an overlocker, they really are an amazing piece of gadgetry.
Home overlocking (serging) machines generally have two needles and two loopers that create an intertwined stitch using up to four threads. All the thread is spooled from the top of the machine. As a stitch is created, the overlocker also trims away the excess fabric to the right, leaving your seam with a line of perfectly overedged stitching. Overlockers also sew exceptionally quickly - about 1500 stitches per minute - so are much faster than a conventional sewing machine.
While overlockers can do many and varied things, this week I decided to look at two very basic finishes: the three and four thread stitches.
3-thread overlock finish
To begin, I matched the right sides of the fabric together and sewed a plain seam using my regular sewing machine.

Next I opened out the seam allowance and moved to the overlocker. A three-thread stitch needs only one needle, so next I unscrewed and removed the left-hand needle from the machine. I then passed the edge of both seam allowances through the overlocker. The seam below has been overlocked and neatly pressed open.
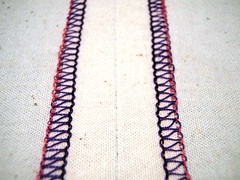
This three-thread stitch is good for neatening seam edges. If you would like to see the stitching in more detail, I have created a notated picture over here. It explains which parts of the stitching has been created by the needle and each of the loopers.
Rather than opening out the seam you may prefer to stitch the two sides of the seam allowance together and press it to one side. I have done this in the example below. I have flipped it up at the edge closest to you, so that you can see the underside of the stitching.
If you think you might need to alter your seams at any stage, it is a good idea to try and sew very close to the edge of the allowance, so as not to remove to much of the fabric. If this is not an issue, then you can stitch quite close to the original seam line and the overlocker will trim most of the seam allowance off.
4-thread overlock stitch
A four-thread stitch sews the seam, as well overedging and trimming the seam allowance off. When you use this type of stitch, you don't need to create a seam with your sewing machine first.
To create the 4 thread stitching, I attached the left-hand needle to the machine again. Next I placed the right sides of the fabric together and then passed the fabric through the overlocker.
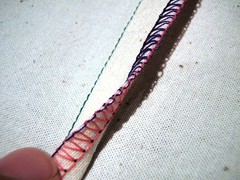
When you use two needles, an additional line of stitching is added. If you look at the photograph below you might (just!) see a red line of stitching running along the left. This is the seam. All the other parts of the stitching (purple, pink and black) form the overedging.

In the example below I have flipped the seam up, so that you can see the underside.
This type of seam is pressed flat to one side. The top side of the seam should be side that had been upper-most when you were stitching.
Faux overlocking - using your sewing machine
Now what if you don't have an overlocker? The good news is some sewing machines come with stitches and presser feet that will approximate an overlocked stitch. The stitch construction is of course more basic than a proper overlocked stitch (as there is just one needle and bobbin) and the machine cannot trim the excess fabric. That said, you can still produce a nice finish.
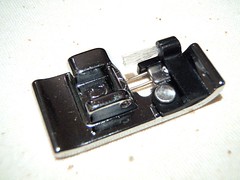
For this experiment, I purchased an overedge foot for my Janome sewing machine (DC3018), then after consulting my manual selected an overcast stitch. You will need to consult the manual for your particular make and model of sewing machine to see if you can do something similar. I'm assuming that the older and more basic your machine is, the less likely you will be able to do this.
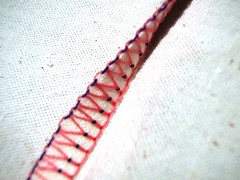
To begin I placed the right sides of my fabric together, then sewed a plain seam. After this I opened out the seam, then sewed using the overcast stitch down both sides of the seam allowance.
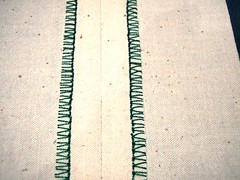
The result looks (to the untrained eye and from a distance!) not dissimilar to a real overlocked stitch. It is a very neat finish. The manual for my sewing machine explains that this particular stitch can be used to seam and overedge at the same time - much like the 4-thread stitch on the overlocker.

Conclusion
I haven't owned an overlocker for very long, so I am still learning how to make the best use of it capabilities. I am also trying to overcome my gross incompetence at threading, which has created more problems than I'd care count! That aside, I do love the beautiful neat and very quick finish that the overlocker gives. If you do a lot of sewing, they are awfully handy.
But I am also quite impressed with the nice finish that the sewing machine gives too. I'd have to say that I will be tempted to use this on the occasions when the overlocker and I are not on speaking terms!
Have you been seaming-along? Which is your favourite?
Next Wednesday: Stay tuned next week, when I will be investigating how to finish seams that are getting too bulky. Read more about bulky seams via Google.


Loving your seam along - linked to it today on one of my posts for a friend who has just started sewing... Thanks!
ReplyDeletereally enjoying seeing all these different seams :) I would love a serger but a good one isn't cheap. hmm going to have to see if my sewing machine will do the faux version
ReplyDeleteHmm I wonder if my Janome fits the overedge foot - must find out as I certainly cant afford an overlocker at the moment. Thanks for the tip
ReplyDeleteHola por casualidad encontre tu pagina y me encanto!!! yo tengo un overlocker brother 2340CV hace ya mucho tiempo, hize un curso que viene gratis con la maquina pero solo me enseñaron lo basico nisiquiera como ajustar para cada tipo de tela; me complica tener la maquina y no poder utilizarla bien, si supieran donde puedo encontrar informacion para manejarla mejor se los agradeceria, gracias por su ayuda y felicidades por tu sitio bye. (vivymn81@gmail.com)
ReplyDeleteReally great post! I have been using an overlocker for about 6 months now and I love the professional finish it gives to my sewing projects.
ReplyDeleteI have to admit, I didn't really know what the difference was between 3-thread and 4-thread overlock stitches - your post is very informative, thanks!
Thanks for this article. You wouldn't believe how hard it is to find a post on overlocking seams! Until now I had no idea how to actually put my overlocker to use...I'm going to try pressing the seams flat and overlocking each side separately.
ReplyDeleteThis was exactly what i was looking for. I don't have an overlocking machine, and wasn't sure if I sew a seam first, then do my pseudo-overlock (ie zigzag stitch) or zigzag first, then sew the straight seam.
ReplyDelete