
Introduction
Week 1 - simple edge finishes
Week 2 - French seams
Week 3 - Bound seams
Week 4 - Flat fell seams
This week I looked at how to stabilise seams. Imagine spending time sewing up beautiful seams only to have them sag and spoil your garment or other project? Knits, loose weaves and bias cut fabrics can all be culprits.
To prevent stretching or bagging you can stabilise seams at points such as shoulders, neckline, waist and pockets with tape. Tape firms and holds the seam in place.
Selecting the tape
Before getting started you will need to choose a suitable tape.
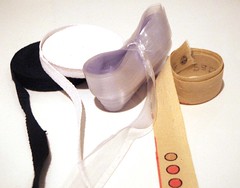
Narrow cotton or polyester twill tape is commonly used (below, left). However, you can also use seam selveges (below, right), soft bias cut strips or tape or even clear elastic (below, middle).
Your choice will depend on the sort the work of the seam. Tape will provide the most rigid, stretch-free seam. Bias strips or tape will offer a little give. Elastic will provide the greatest stretch, but allow the seam to recover to its original length.
Clear elastic is often used on stretchy knit garments. If you look through your wardrobe you might find it used around armholes, necklines and at the shoulder.
Measure the length of the tape you need for each seam from your pattern. If you are using elastic it is recommended that you "warm it up" by giving it a stretch a few times before measuring and cutting it.
Taped seam - sewing the seam and tape at the same time
There are two ways to tape a seam. This first method is the quickest.
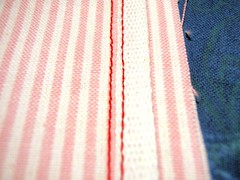
To begin, place the right sides of your fabric together. Line up the tape over the stitching line for the seam. Stitch as close as possible to the side of the tape. If you are using elastic, avoid stretching it as you sew.

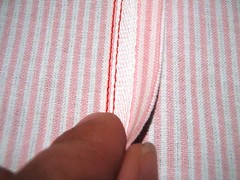
Open out the seam. It will sit best if it is pressed to one side.
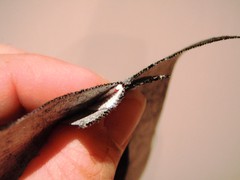
As you might (just!) be able to see here, there is a downside to sewing seam and tape at the same time. Here I have opened the seam flat, rather than turning it to one side. The tape has folded a little bit. The seam allowance on the taped side becomes a bit bulkier and uneven.
Taped seam - sewing the seam and tape separately
To create a less bulky seam, you can stitch the seam and the tape separately.
To begin, place the right sides of your fabric together and sew the seam.

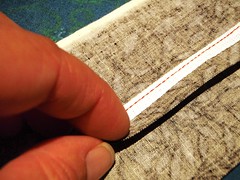
Place the tape in the seam allowance, lining it up as closely as possible to the stitch line. (If possible choose the side of the seam allowance that will not be in contact with the fabric, when the seam is pressed.) Stitch the tape in place, ensuring that you stitch as close as possible to the edge.
Open the seam out and preferably press it to one side.
Conclusion
I think I preferred the second method. It looked neater and seemed firmer when I finished. It was only a little bit more work. I am looking forward to trying out clear elastic with a knit fabric I have purchased.
Have you been seaming-along? Which is your favourite?
Next Wednesday: Stay tuned next week, when I will be investigating how to finish seams with overlocking or serging. Read more about stabilising seams via Google.


My goodness! you are a wealth of information here at hoppo bumpo. Thank you for passing on such pearls of wisdom. x
ReplyDeleteYou are a very clever girl! Ditto on the thanks for sharing your knowledge - I'm always keen to try things, rarely clued up enough to know how. I get a picture in my head of what I want, just don't know how to get from A to B. So on I fumble! Posts like this are great for novices like me. Thank you.
ReplyDeleteAlso, I noticed your crocheting thread which is a topic close to my heart at the moment. Your squares looked great compared to my first attemts. I chuckled all the way through your posts. What ever happened to the Afghan rug???? Cheers, MissyP.
Very educational. I have never really heard of this, but it makes some material lists for different patterns I have been looking at lately. I was thinking "what on earth would you use "tape" for??. SO now I know. I have not sewn much with knits yet. I am a bit scared I think actually.
ReplyDeleteWho knew there were so many seam options!! not me. My favourite was the french (enclosed) seam - and I had a go at them today. thanks very much :)
ReplyDelete