
On the day that they were handing out the productivity gene, I somehow missed out.
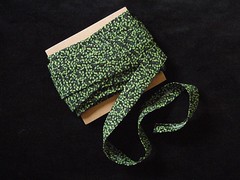
Take for example the bias binding I made last month. Painfully slow. How I laboured over the process of transforming those plain fabric strips into such a simple trim. And what did I have to show for three hours work? Just one and half metres. Ridiculous.
A pity. Because I have a new project in mind and it needs 9 metres of bias binding. I'd do the math on how long it would take me to make, but after such a warm day, I'd prefer not to offend everyone's sensibilities. Counting on one's toes is so risky in the warmer months.
So what to do? Do I call in a man with a white coat and clipboard for a time-and-motion study? Or give up and simply purchase a ready-made trim?
Daringly, I decided to go on a different tack.
Hack (n): quick and dirty productivity trick used to get your work done hastily
Here are my bias binding hacks:
- Iron nothing; square nothing.
- Fold your fabric on the diagonal with a careless flip. What the heck if its not completely on the bias - how much stretch do we really need here?
- Remember, measuring is overrated. What's a few millimetres between friends?
- Avoid ruling out all those lines with tailors chalk - cut one strip and then use it as a template for the rest.
- Ditch the rotary cutter; use scissors with reckless abandon. If your straight lines look as if they have been cut with pinking shears, explain it away as a decorative feature.
- Whip the binding through the tape maker at break-neck speed. Avoid looking down unless you feel that you are in imminent danger of a steam burn from the iron.
- Remember at all times that less is more; less attention will make more binding.
And so it is, that I have just finished making 9 metres of bias trim ... in a fraction of the time of my first effort.
And you know what? The quality varies very little from my first very cautious, meticulous attempts. Should I be pleased or worried?


Now I think you should definitely be very pleased because you didn't give up after the first go!
ReplyDeleteIt takes determination and guts to try something that you hated the first time around...although it would have been a bit hot and sweaty using the iron today!
Pleased, I would say. I need some bias binding. Might have to attempt your method but if I burn my fingers from the iron, you can be sure to hear from me LOL.
ReplyDeleteI vote pleased. If I voted any other way, I'd have to vote myself out, too, since you pretty much wrote a word for word description of how *I* make bias binding. :lol:
ReplyDeleteI agree measuring at times is overrated! Who needs to follow rules anyway, just follow your head and get the horrible stuff made fast!!!
ReplyDeleteDefinitively you have to be pleased!!!
ReplyDelete(and thanks for this post, :)you made me feel good)
I've always made my binding pretty much that way. I do iron, but otherwise just fold and cut. I figure any irregularities are just getting folded under and don't show. I also don't use the bias make thingy to get the folds, I just sew the strips on, iron them flat, fold them under, sew and iron again.
ReplyDeleteI was a little concerned I was doing something wrong when I'd see all the tutorials on making bias tape, so I'm glad to see some justification in your post!
Well, you lot have inspired me! I've been in the meticulous camp, except I don;t have a boas maker-thingy, just an ironing board and some singed fingertips. I'm going to get a little easy on the bias and whack some through next time. Cheers for giving me 'permission' - all of you!
ReplyDeleteOk... you definitely need to drop in one day for a bias binding tutorial!!! I probably wont have time this Sunday, but the invitation is open. Bring the wee boys - the studio looks more like a creche than a studio so they'll enjoy it - trikes, tunnels, craft materials galore, dvds... - and I can show you how to be super-quick AND accurate!!
ReplyDeleteIn the meantime, if your new approach is working, go with it.
You are my absolute favourite hack. Ha ha - I think everything I do is hack worthy. Cant wait to see what you are making with 9 metres of bias - should be good.
ReplyDelete9 meters of bias? What are you making? that's one gigantic baby bib.
ReplyDeleteTerrific hacks! I'm rather fortunate on bias cutting. Months ago, I sent my husband to the store and said "buy me a long ruler, like a yardstick." I was certain that I'd get some crappy wooden job that splintered each time I use it. But the wonderguy surprised me with a 2 1/2" bias ruler. It's a dream! You can mark in no time flat.
Well I'm really slack on don't cut it on the bias. I just cut the strips (although I do use a ruler and rotary cutter) then sew them together and whip them through the bias maker thingy.
ReplyDeleteOmigosh... as soon as I read the title of this post I knew it would be good (you know what a fan I am of hack sewing techniques!!). What are you going to do with all of that bias binding?
ReplyDeleteThis is encouraging! Thank you and well done!
ReplyDeleteYou should be so pleased! With your hacking advice I now feel like I can take on the bias binding world.
ReplyDeleteI swear I did the same thing. I made nice follow the rules bias tape once, and said never again. Now I just guess and it works out just fine!
ReplyDeleteBrilliant news! I can now get the tape maker out of the drawer! It wsa easier to drive to NSW (our closest Spotlight) and buy tape than to follow those damn instructions...
ReplyDelete