
Janome Even Feed Foot
With Quilting Guide
RRP AUD$65
I have recently bought my first walking foot. If you're not terribly familiar with one of these super-duper gadgets (like me, until a short time ago!), its purpose is to prevent layers of fabric from shifting or slipping as you sew. The walking foot has its own set of dog feeds, which means that as fabric passes beneath the foot it is held and fed evenly by both the upper and lower feeds. Walking feet can be used for tasks such as quilting and sewing temperamental fabrics.
Installation
To be honest when I first bought my walking foot home I was a bit stuck. I'd never used a walking foot or seen one in action. And when I spend serious dollars on a machine foot - the sort that one that does not simply clip on and off the machine - I really want ... instructions!
The foot came with one small diagram on the back of the packaging, showing it neatly installed. There was no guidance as to how to attach the foot to your machine and the diagram was missing a bit of information about what to do with a little lever that sits on the right. So I had to take my walking foot along to my evening sewing workshop and beg help from my lovely instructor. Who in turn said, um, er, how about like this? A screwdriver and some dis-assembly, careful positioning and re-assembly was required. I'm glad my confusion wasn't simply me being a bit thick (as is so often the case).
So Mr Janome, if you are listening ... some instructions wouldn't go astray!
Performance
As promised a couple of weeks ago, I have conducted a series of experiments with the walking foot to see how easy it made the sewing. (My sewing machine is a Decor 3018 and I used the foot without attaching the quilting guide. I changed machine needles to suit the different types of fabric.) Here are my findings. They are all just personal opinions and nothing has been done under strictly monitored, reproducible conditions. If you have used the same foot and have more information to add or need to correct something I have said ... please feel free!
Experiment 1 - Velvet
I was halfway through a project using velvet, when I purchased the foot. Using the regular foot I experienced huge amounts of slippage sewing the seams. This was despite very careful pining and basting.
The walking foot made quite a difference. The project went from being I think I am going to have a nervous breakdown to just this velvet is a pain to work with. It didn't make the sewing a cinch, but it was very helpful.
Velvet is my bete noir ... the less time I spend talking about it the better!
Experiment 2 - Quilting
I had never done a scrap of quilting until this experiment, so you may like to take whatever I have to say here with a grain of salt!
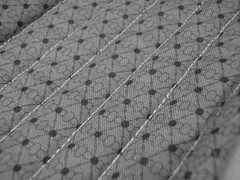
Floundering for something to do, I simply sandwiched six layers of thin batting between two pieces of cotton. Being the lazy girl I am, it never struck me to tack, let alone pin everything before getting started. I used my slothful finger basting technique. So under the circumstances and despite the user, I thought the foot did a brilliant job. The whole thing fed through very nicely, making the job of sewing my hugely complicated pattern (straight lines, pictured above) very easy .
(I believe that if you want to do something a bit fancy in the free-motion line, then you need to use a darning foot. I've got one of those, but given my slap-dash approach during this experiment, I don't think I am responsible enough to use it yet.).
Experiment 3 - Vinyl
With some previous experience of sewing vinyl, I was able to whip out some offcuts and replicate a little bit of a previous project. When I last sewed with vinyl there was much wailing and gnashing of teeth. I really didn't enjoy the experience at all - the material stuck to everything; along every step of the way. This time, it was - to use a Mr Hoppo Bumpo-ism - a complete doddle. The PVC fed through like a charm, even when it was up to four layers. I would happily try sewing a vinyl bag again sometime soon.
Experiment 4 - Denim
I am currently sewing up some little trousers refashioned from Mr HB's old jeans, so had lots of left-over pieces to experiment with. I took a piece of nice thick side seam and folded it over, so that it was a suitable challenge and then sewed through it. I would never have made it over this kind of thickness with my normal presser foot. Again the walking foot was a dream. It lifted gracefully, but firmly over the top and kept the stitching on the straight and narrow.
Conclusion
There are loads of other things that I would like to try out with the foot: in particular knits and plaids/checks. I hope to get to them soon. So far though, I really am very pleased with the foot. If you have a Janome machine, I don't think you will be disappointed with this handy accessory.
Do you already have a walking foot? Do you enjoy using yours?
Update: If you would like to see how to attach a Janome walking foot, please see my illustrated post here. I have also scanned and uploaded some old Janome instructions here that I picked up at a sewing shop.


Great post, I bought a sewingmachine off ebay for 28 dollars and I have not used it yet, its a neechi, I may not be spelling that correctly but I may take it out of the case this week and tinker with it, I did not know that a foot could cost 65 dollars wow that is a lot to me for a small piece of metal.
ReplyDeleteI have a Janome - a very basic one - but have never bought any accessories other than those it came with. I do like the sound of a walking foot though, and also the darning foot. I may have to treat myself next month for the birthday! Great post thanks - lots of helpful detail. J
ReplyDeleteI love my walking foot and use it almost every day! Once you get the knack of putting it on it's just like changing any other foot. It seems like alot of money but if you want stress free sewing then it's a MUST have!
ReplyDeleteThankyou for the review, wish I had have seen it a couple of years ago before I had my foot. I would have got one sooner.
Great to hear that it was a success. I've never used a domestic machine with a walking foot, but I left an industrial free-arm walking foot machine (how's that for a mouthful?) on the other side of the world and miss it almost every day.
ReplyDeleteThanks for the fab review. I tried out my new darning foot yesterday. I might just have to head back to the shops for a walking foot now too!
ReplyDeleteWell, HB, I am completely sold on the walking foot - so much so, that I just googled one to buy it, and guess what?? I already have one!!! When I saw a photo of it, I recognised it straight away :)
ReplyDeleteMy mum gave me her old machine about 3 years ago, and I put the walking foot in a drawer, not knowing what it was!
Now I just need to work out how to put it on :P
great post, have never thought about a walking foot until now
ReplyDeleteI love my walking foot- when I remember to use the darn thing (no pun intended). You have got me thinking about a darning foot for free form quilting. I didn't know about using them! Great post.
ReplyDeleteI'd never even heard of a walking foot before you mentioned it. However I've had troubles with slippage in the past and this certainly sounds like the solution to my problems. Thanks for the run down!
ReplyDeleteThanks for the instructions. I tried to use mine the other day, & for the life of me couldn't work it out. After looking here, it was a breeze. Just used it & makes a huge difference!
ReplyDeleteYour link to instructions doesn't work, and so far you're the only page I've found online that sounds like it can help me install/use my even feed foot! help!!
ReplyDeleteHi Kimberly. Sorry the link isn't working for you. If you would like to contact me directly (see sidebar for e-mail address) I would be more than happy to send you the diagram.
ReplyDeleteThank you sooo much for the diagram. I felt the same way when I first got my walking foot. It was totally wierd trying to guess based on the image on the back.
ReplyDeleteTHank you thank you thank you!!!! There were NO instructions with my Janome, which already has the walking foot. I am making luggage tags and putting vinyl on top to protect the address label. It was so easy to put the foot on with those directions! Otherwise, I was completely stumped!
ReplyDeleteThis comment has been removed by the author.
ReplyDeleteThis comment has been removed by the author.
ReplyDeleteThanks ever so much Liesl - I found this really useful when I was first using my foot at around the same time you got yours. So I have linked to you at my blog http://www.buxtonbaby.blogspot.com/2010/02/sharing-love-installing-your-janome.html
ReplyDeleteabout installing the walking foot, hope that is ok! Cheers, Pip B.
Liesl, thanks for the post. I googled 'how to install walking food on janome sewing machine' because for the last 20 minutes, I have been sitting at my machine feeling stupid and wishing I had been born with a dash of spatial estimation ability! I agree, some instructions would have been handy, but clearly Mr Janome credits us with super-human intelligence. Your instructions are a blessing - the link works when you click the word 'here'. Thanks!
ReplyDeleteThank you very much for this info, was not sure whether the walking foot was the right thing to buy but now I know for sure. Love your website, very informative, I am now off to make my first quilt! ps. don;t know what a profile is so have left my name as anonymous, I am also in Melbourne's south eastern suburbs.
ReplyDeleteYou are today's life saver!!! Sat here with my first quilt ready to 'quilt' and said new Janome walking foot and er, no instructions for fitting it - aaarrrggghhh!!! Thank you so much for posting this info. Goodness only knows why there are none of the packet of what you rightly say is a very expensive bit of kit.
ReplyDeleteSharon xx
You are an angel! The photos and instructions were wonderfully understandable. After seeing how you do it, I feel so much in charge of that foot now!
ReplyDeleteWe women must understand that men's technical brains do not know how to explain things in a language that we can understand, thus no instructions! Oh and that goes visa - versa.
Thanks much!
Hello, i think that you should add more images.
ReplyDeleteThankyou- just bought one and so glad to find this easy tutorial on how to attach and use it! :)
ReplyDeleteyes thanks very much , bought my walking foot today and had no idea how to use it as it came in a small plastic bag and no instructions at all.
ReplyDeleteso now I feel I can do this with the help...thanks again
I consider buying the foot so the post was helpful. I hope it will be useful in my projects.
ReplyDeleteI wonder if you have ever used binder foot?
Thanks
Hafticraf.blogspot.com